
WordPress Migration & Testing
[vc_row][vc_column][vc_column_text]The white page of death. You were sailing through updating your WordPress installation and just after the process completes, you have only a blank, white screen to show for it. Nothing works. How could this have been prevented?
Would you take a newly designed ship to the Arctic Ocean with hundreds of tourists aboard without testing it? I hope not!
The best way to prevent this is by making sure updates are tested on a separate server before you use them. That way your model boat will capsize and sink in a lab instead of the full-sized boat filled with tourists. This post in my WordPress Security series, will walk through a migration and testing process. Developing a plan of your own from this guide may prevent any future issues on your website.
How do I start and what is migration anyway?
Start by thinking about and documenting a workflow that will work for your website. A typical scenario for migration and testing involves two running WordPress instances. Let’s call them “test” and “live.” The test server is your model boat in the lab. It may be on your personal computer or a server in the cloud. Consider the live server as the website you would like users to visit. Before using the test server, make sure it is using the latest content from your live server. The term migration describes the concept of backing up your content from one website and restoring it to another. Migrating a WordPress instance does not need to be a complicated chore. Paying attention to some important details and creating a plan can lead to a smooth process.
Plan
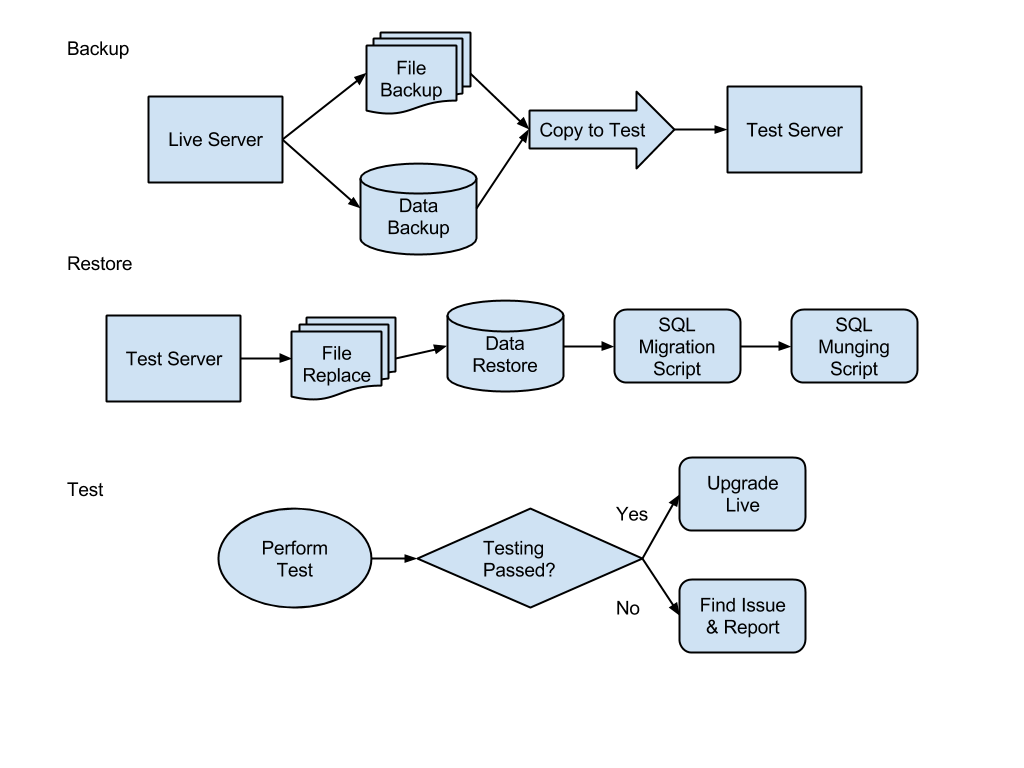
Documenting what needs to be done can involve a list of steps on a notepad or be elaborate as a dedicated website with animated graphics. The documentation should include the entire process, including a list of important operations requiring a check. Sometimes a workflow chart might be easier to comprehend than a written list of steps. Below is a basic example of migrating (backup and restoring content) and testing using a test and live server:
Execute
Execute the plan by first initiating your test server with the same theme, plugins, and content as your live server. The closer the test environment is to live, the more accurate the test will be.
Tip: If possible, use a domain for the test server that has the same amount of characters as your live server. This will allow all of your configuration to be read by both servers. Most configurations are stored by a serialized array. PHP stores the string length as part of the data. If you change the length of any configuration data with your SQL script, it will not allow PHP to load the serialized array properly. For example, using live.domain.com and test.domain.com would work. Using www.domain.com and test.domain.com would not.
Once you have set up a WordPress server with the same themes and plugins, migrate your content. Back up your database and files using a method you have comfort with. A MySQL database can be exported rather simply with the mysqldump command. An example might look like this:
mysqldump -u myusername -p wordpress > wordpress_backup_20150131.sql
This command will prompt you for a password and save the database as a file named wordpress_backup_20150131.sql. The file may be compressed, moved to another location, and run as a SQL script to create a database that is an exact copy of your live server. Other methods to backup the database are using tools such as phpmyadmin or Updraft Plus.
If your test server uses a different domain than your live server, a SQL script needs to run after you create the test database to configure WordPress properly. Use the example below to create your own script that changes most references of your live domain (livedomain.com) to your test domain (testdomain.com).
DO THIS ON YOUR TEST SERVER DATABASE — NOT YOUR LIVE DATABASE
update wp_options set option_value = 'http://testdomain.com' where option_name = 'siteurl';
update wp_options set option_value = replace(option_value, 'livedomain.com', 'testdomain.com');
update wp_posts set post_content = replace(post_content, 'livedomain.com', 'testdomain.com');
update wp_posts set post_content_filtered = replace(post_content_filtered, 'livedomain.com', 'testdomain.com');
update wp_posts set guid = replace(guid, 'livedomain.com', 'testdomain.com');
update wp_postmeta set meta_value = replace(meta_value, 'livedomain.com', 'testdomain.com');
Change your table prefix (wp_) to the one you used during the test servers installation. If your database contains any user information, it is a great idea to run a SQL script that replaces any sensitive information with harmless data. This process is called data munging. The tables holding user data are wp_users and wp_usermeta.
The test site should load in your browser once the database has been restored and as long as the WordPress configuration file is pointing to it. However, there might be images missing that we’ll need to load from the live server. WordPress usually stores uploaded images in a directory called uploads in the wp-content folder. If another folder has been specified, check for that setting in the wp-config.php file. To move the contents of the upload directory to the test server, use a compression program (zip, gzip, tar) to create a single file archive, move the file to the test server, and replace the test server’s existing uploads directory.
For example:
zip -r uploads_live_20150131.zip uploads
Move uploads_live_20150131.zip to your test server and replace the uploads directory:
mv uploads /tmp/;unzip uploads_live_20150131.zip
Now check your test website. Do the images appear? If not, investigate your web server’s logs and check the file permissions.
The final step is to upgrade the test server and perform a check of all important operations. Use the list made during planning to ensure you cover them all. If all of the operations work as expected, update the live server and check the logs for any unforeseen issues.
There is more good news — you have also documented a backup and restore process for your website. If you skip the data migration and munging SQL scripts, a complete website restore may have been accomplished.
Check out my other WordPress security posts and watch this space for future posts in the series![/vc_column_text][/vc_column][/vc_row]